Powered By Blogger

Pages

Tuesday 27 November 2012

Magical / Mystical at Incy Wincy

 Sorry running late with this post should have posted it yesterday morning but real life has got in the way this week. This weeks challenge at Incy Wincy is
Magical / Mystical
and we are sponsored by the great
I have used one of Terri's fab images and coloured her with promarkers and added lots of glamour dust to the snowflakes. My paper is a freebie one from Bearly Mine the die cut is from Memory box and the sentiment is from Craftwork Cards.
 I have used one of Terri's fab images and coloured her with promarkers, added glamour dust to the snowflakes and used a sakura pen to add sparkle to her hair. My paper is a freebie one from Bearly Mine the die cut is from Memory box and the sentiment is from Craftwork Cards
Sideways view so you can see the sparkle.
I would like to enter this card into the following challenges:
Bearly Mine Challenges - Blue & silver
Try It On Tuesdays -  Christmas Sparkle

Fashionista Challenge - Blue Christmas


Wednesday 21 November 2012

Another Lighthouse Card

I had another go with my lighthouse stamp and this is the result which I love. I have again coloured it with my distress inks. I have used the compass stamp from the same set to create the background.


I used the compass stamp again on the inside of the card.


Monday 19 November 2012

Hip to be Square at Incy Wincy

This weeks challenge at Incy Wincy is a nice easy one
'Hip to be Square'
as usual we have a fab sponsor who this week is
 
I have used on of our sponsors cute images i coloures the bear with my promarkers and paper pieced his present adding stickles to the ribbon and bow. The papers are from Studio Calico Wonderland collection.


I would like to enter this card into the following challenges:
Paper Creators Challenge - All about Christmas
Paper Play Challenges - Paper Piercing
The Crafty Pad Challenge - It's Starting To Look A Lot Like Christmas


Friday 16 November 2012

'Frosty Festivities' blog hop


I know unusual to find me posting at this time of day (well at least I hope it has posted as I'm not at home hopefully I'm making lots of sales at a ladies evening as you read this) So if Mr Blogger has been good and posted I'm taking part in my team mate Jennifer's latest blog event Frosty Festivities.
I've pinched this blurb from her blog to tell you all about what is going on.
 
On Friday 16th November – Sunday 18th November I will be holding a Blog Event called ‘Frosty Festivities’. Over that weekend there will be posts every hour from 4pm-10pm Friday, and 10am-10pm Saturday and Sunday (GMT), all on the theme of 'Winter' including tips, tutorials, challenges, crafts, a blog hop, and lots of giveaways.
 
 
As part of the event she is holding a blog hop which if you are following you will have arrived from
if your not what are you waiting for head over to the first stop of the hop which is
 
 
'If you comment on all the blogs in the hop, finishing at Jennifer's blog don't forget to let her know by leaving her a comment you could win a spectacular seasonal prize of Basic Grey Aspen Frost and Carta Bella Winter Fun items, worth over £25! All entries must be received by Monday the 19th of November at 10.59pm GMT. Your next stop along the hop is


For my part in the blog hop I have made a wine bottle tag with a pocket for some little chocolates to add to that boring bottle of wine your going to give as a present at Christmas.
 
Now these are really easy to make you need a piece of card 7 x 21 cm and another smaller piece 9 x 12cm.
On the larger piece score at 6.5 cm.
On the smaller piece you need to score the 9cm side at 6  & 7.5cm. on the 12cm side you need to score at 1.5, 3, 9 & 10.5 cm.
Take the smaller piece which will become the box on the front of the tag and cut the tabs as the photo above.
Next taking a nestie shape or you could use a circle punch cut a hole out to make it easier to get the chocolates in and out of the box.
I have used a matching nestie in a larger size to shape the bottom of my tag. By placing your tag through you nestie as in the photo above you will only cut the bottom edge.
You will need to cut a hole in the top section of you tag so that it fits over your wine bottle. The decorate your tag either with pretty papers or as I have done stamps.
Stick the pocket together .

 Attach the pocket to your tag
Cut a circle frame using 2 different sized nesties.
 stick the frame around the whole you cut in the top of the tag.
 Decorate the front of the pocket and add chocolates.

 Now hop over to Jo.B's blog and see what she's come up with.


Thursday 15 November 2012

S J Crafts- November challenge


This months challenge at S J Crafts is
Christmas
 with the added optional challenge of  "mix up the alphas"
I've made an Easel Card Luminaire for this months challenge. I've used this gorgeous Hero Arts stamp. Papers are old ones from my stash which I have inked with Antique Linen distress ink. I kept the embellishments quite simple just adding a couple of sticky backed pearls to the corners and the cute little wooden deer. I've kinda done the optional part of the challenge by using a sentiment with different fonts.
I thought I would do a little tutorial to show you how easy it is to make this special Christmas card.
 

First of all you will need to pieces of card the larger piece is 23 x 19 cm and scored down the middle like a card blank. The smaller piece is 12.5 x 19cm and is scored at 1cm down the shorter side. The black lines in the photo are the score lines.

Add your pretty papers to one half of the larger piece and the smaller piece leaving the bit above the score line blank. I have inked my paper with Antique Linen distress ink and then gone around the edges with a gold ink pad.
Next stamp your image onto Vellum and allow to dry. While you wait cut a hole in the smaller piece of card to fit your image.
Once your image is dry you need to frame it I've used a spellbinders frame set and die cut my frame,  stick your frame to you image.
Place the framed image over the hole that you cut in the smaller piece of card and stick.
Now take your larger piece of card and along the top edge of the bit you left undecorated attach the smaller piece by the 1 cm strip that you left blank.
 
You should now have something that resembles a easel card  just add your stopper I used a sentiment on my card and add any embellishment you want.
The candle just sits behind the front panel and as you can see I've added a strip of paper around the candle to tie it in with the card.
I hope you have found that useful I would love to see what you make if you follow my tutorial.
 I would like to enter this into the following challenges:
The Paper Shelter Challenge - Easel card with christmas theme
Southern Girls Challenge - Christmas projects
Craft Us Crazy - Favourite colour and or Holiday Theme
4 Crafty Chicks - Winter


Monday 12 November 2012

Studio Calico Wonderland Collection Part 2

 
Earlier in the week I showed you some cards that I had made using  Studio Calico Wonderland Collection. Today I have two little gifts to show you which would make ideal Christmas presents. 
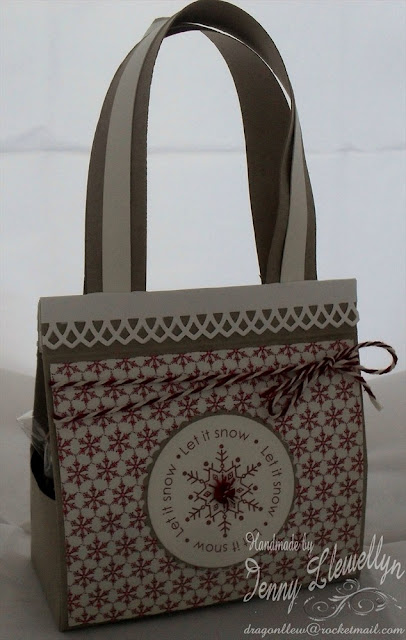
First is a little gift bag that I made out of Kraft card which really seems to work so well with many of the papers in this pad. The snowflake paper is again from the Wonderland Collection and some red twine this time. The sentiment is a digital one from Whimsy Stamps and I added a tiny button which I coloured to match and tied with twine to the centre of the snowflake.
The bag opens up and revels a little pocket into which I put a few celebration sweets. I followed this tutorial to make the bag.
 Now for something completely different papers are again from the Wonderland Collection and I think this shows just how versatile this collection is as I gone away from Christmas completely and made a tea light holder. You can see it below with the candle lit.
 
I followed this tutorial to make the tea light holder


Girl Power at Incy Wincy

 Sorry running late with my post this week forgot completly to write this up last night but never mind better late than never! This weeks challenge over at Incy Wincy is
Girl Power
and we are sponsored by the fantastic
I have of course used one of our sponsors image which is called Mistletoe and the sign is from the Christmas Accessories pack. I used my promarkers to colour her and the sign. Not much else to say about my card today as I kept it very simple. the background is embossed in my cuttlebug and then I have added Aleene's Glitter Snow to the floor and just matted it on to red card.  
A little sideways view so you can see the dimension on the snow.


Saturday 10 November 2012

Studio Calico Wonderland Collection Part 1

 
This month Sarah gave me Studio Calico Wonderland Collection to work with, I love the range of colours in this pad you have your traditional red's and Greens but also some blues, creams and browns. I made a few different things to try and show how versatile this collection is. Today I'm going to show you some cards and later in the week I'll show a couple of ideas for some little Christmas presents.
First up a nice simple card using Kraft card to mat the DP onto and some twine wrapped around the paper makes the card feel quite rustic. I have used glossy accents to highlight some of the pattern on the paper and stamped a sentiment in Rich Cocoa Memento ink.
 The large snowflake has been cut from DP and then covered in glamour dust and the smaller one is cut from white card, a clear button tied with some blue twine finishes the snowflake off.
Another simple card this time using one of the green papers simple matted onto some dark green card stock and then onto a card blank. I stamped the sentiment in Tuxedo Black Memento and the drew the square around the card with a fine liner. The snowman is a die cut which has been embossed and coloured with promarkers.

Monday 5 November 2012

Giving Thanks at Incy Wincy

 Good morning time for a new challenge over at Incy Wincy and this week our challenge is
Giving Thanks
and we are sponsored by the fantastic
 I have of course used a gorgeous image from our sponso this one is called Cerridwen isn't she beautiful,I have coloured her with my promarkers adding a touch of sparkle to the butterflies with some stickles. My Dp is from a MME pad, Lost & Found 2 Breeze. I've added some flowers from my stash and a litlle bronze butterfly charm which I attached to an eye pin and attached it to the card with an eyelet.

Quick glance at the inside of the card where I've sed more of the DP and a Memory box die cut.
 
I would like to enter this card into the following challenges:
Sentimental Sundays - Dimensions
Brown Sugar Challenge - Pearls & Lace  ( pearls are in the top left corner)
Fussy & Fancy - Pearls and flowers  ( pearls are in the top left corner)

Stamp & Create - Lace